
个人博客优化记录
本文记录了个人博客优化中的方法可供参考,包括公式显示,插件使用,美化等方面.
基于的版本:Icarus(0.13.0).
[TOC]
1. 公式显示问题
_config.icarus.yml文件里打开plugin->mathjax为true,尝试使用katex,发现没有作用因此只打开了mathjax.\\公式不换行,原因是\会被markdown特殊处理,所以必须打出四个\才能正常换行.- 某些公式不显示,在VS code中显示成功,web端失败.排查空格等因素无效,通过mathpix软件截图得到正确的公式代码对比发现是语法问题.VS code插件支持的太好了反而一些语法不精确的用法也能正常显示.后面写公式时要保守地写.
example1:
1 | $$\int _{y_0}^{y_i} \big ( \sqrt{1+{(x'(y))}^2} \big ) dy = \int _{y_0}^{y_i} \big ( \sqrt{1+ {(c_1 + 2c_2y+3c_3y^2)}^2} \big ) dy = s_{interval} * i$$ |
其中\int _应该为\int_.
example2:
1 | $$x''_1(t_{10}) = |
第一个导数符号''的位置错误,应该为 x_1''(t_{10}),为了避免无意识的顺序问题,应该使用^{\prime}的形式.
example3:
1
$$cost = \sum_{i=1}^n \bigg( \int^{t_{i1}}_{t_{i0}} ({x_i}^{\prime\prime\prime})^2(t)dt + \int^{t_{i1}}_{t_{i0}} ({y_i}^{\prime\prime\prime})^2(t)dt\bigg)$$
\int^{t_{i1}}_{t_{i0}}应该为\int_{t_{i0}}^{t_{i1}}.当初写的太随心所欲了…
hexo render error
公式中含有{{` 或者`}}连续的花括号时,渲染会出错,需要用raw标记消除.参考链接:https://github.com/hexojs/hexo/issues/1605.1
2
3{% raw %}
content
{% endraw %}伪代码的公式表达
把伪代码当作公式传入,到目前为止有两点需要注意:1. 不要太长,大概50行是极限,否则面临无法渲染成功的窘境.2.不知道为什么
<>符号的两端必须加上空格,否则无法完成渲染, 即便使用 包围.这个虽然暂时不理解语法原因,以后先照做吧.
2. 插件的使用与特定功能
2.1 hexo-generator-feed与RSS
RSS(Really Simple Syndication)简易信息聚合,在互联网上被广泛采用的内容包装和投递协议.它是一种描述同步网站内容的格式,使用xml格式.当网站内容更新时,可以通过订阅RSS源在RSS阅读器上获取更新的信息.
安装nmp package:hexo-generator-feed->github
1
npm install hexo-generator-feed --save
配置Feed
_config.yml新增的内容如下:1
2
3
4
5
6
7
8
9
10
11
12
13
14/// file in config.yml
feed:
enable: true
type: atom
path: atom.xml
limit: 20
hub:
content:
content_limit: 140
content_limit_delim: ' '
order_by: -date
icon: icon.png
autodiscovery: true
template:_config.icarus.yml中更改内容如下1
2
3
4
5
6/// file in _config.icarus.yml
widgets:
social_links:
RSS:
icon: fas fa-rss
url: /atom.xml上传至服务器端,点击RSS按钮可跳出
xmlfeed如下所示:1
2
3
4
5
6
7
8
9
10
11
12
13
14
15This XML file does not appear to have any style information associated with it. The document tree is shown below.
<feed xmlns="http://www.w3.org/2005/Atom">
<title>分享-成长</title>
<icon>http://www.chuxin911.com/icon.png</icon>
<subtitle>cx的博客</subtitle>
<link href="http://www.chuxin911.com/atom.xml" rel="self"/>
<link href="http://www.chuxin911.com/"/>
<updated>2021-07-20T13:17:46.060Z</updated>
<id>http://www.chuxin911.com/</id>
<author>
<name>cx</name>
</author>
<generator uri="https://hexo.io/">Hexo</generator>
<entry>
...
2.2 hexo-component-inferno与分享按钮
安装插件
1
npm install hexo-component-inferno --save
根据官网步骤添加AddToAny按钮分享功能.
2.3 hexo-generator-index-pin-top
1 | npm install hexo-generator-index-pin-top --save |
更改文章排序方式,icarus中默认方式为日期,使用这个插件即可在front-matter中加入top标签实现排序(top值相等的情况下依然按照日期排序),top值越大排名越前.
3. 功能优化(挂件)
3.1 文章目录
在主题配置中添加如下挂件配置:
1 | /// file in _config.icarus.yml |
在需要开启目录的文章front-matter处加入toc: true.
3.2 邮件订阅
Icarus的邮件订阅功能由Google Feedburner提供.
但是Feedburner已经正式不被支持了,随时可能会被停止服务.后面再寻找替代品.
下面参考的是这篇博文
- 登录Google Feedburner,在输入框内输入RSS地址并点击”下一步”(Next) 来添加RSS源.

- 在下一页中填写”源标题”.点击”下一步”(Next)来继续自定义源,或者点击”直接跳到源管理”(Skip directly to feed management)来完成配置.

- 完成添加源后,点击网页顶部的”我的源”(My Feeds)链接.点击”我的源”(My Feeds)页面上新添加的源.

- 切换到”宣传”(Publicize)标签页并点击页面左侧的”邮件订阅”(Email Subscription)链接.点击”激活”(Activate)按钮来开启”邮件订阅”(Email Subscription)功能.

- 在”邮件订阅”(Email Subscription)页面上从HTML代码中找到如下信息

- 复制
uri=后的ID(如feedforall/ABCD)到挂件配置的feedburner_id设置中,_config.yml 设置示例如下1
2
3
4
5
6
7widgets:
-
position: left
type: subscribe_email
# (可选) 描述文字
description: 邮件订阅,更新早知道
feedburner_id: feedforall/ABCD
3.3 文章布局(挂件)调整
在icarus源目录下新建_config.post.yml配置文件即可配置布局.例如只在右侧添加目录.
1 | widgets: |
3.4 TOC(文章大纲)的使用
具体实现的效果如#835 issue(自适应折叠滚动).
解决办法,修改max-height与overflow-y,同时将collapsed改为true:
1 | /*FILE:hexo-theme-icarus/include/style/widget.styl*/ |
1 | #FILE:_config.post.yml |
3.5页脚添加备案信息
在\blog\themes\icarus\layout\common\footer.jsx的如下代码处插入两行代码即可:
1 | <p class="size-small"> |
Icarus的官方备案信息添加貌似在开发中.
3.6 键位效果设置
HTML 有<kbd></kbd> 标签来实现键位效果. Hexo 默认是不支持键位效果的. 有 2 种方式可以实现.
插件
hexo-tag-kbd安装:
1
npm install hexo-tag-kbd@latest --save
语法例子:
1
{% kbd Ctrl %} + {% kbd ALT %} + {% kbd DELETE %}
效果:

增加 CSS style, 此处基于 Icarus, 其他 Hexo 的博客平台原理也是一样的.
在
node_modules/hexo-theme-icarus/source/css/style.styl下新增如下代码片段:1
2
3
4
5
6
7
8
9
10
11
12
13
14kbd
display: inline-block;
margin: 0 .1em;
padding: .1em .6em;
font-family: Arial,"Helvetica Neue",Helvetica,sans-serif;
font-size: 11px;
line-height: 1.4;
color: #242729;
text-shadow: 0 1px 0 #FFF;
background-color: #e1e3e5;
border: 1px solid #adb3b9;
border-radius: 3px;
box-shadow: 0 1px 0 rgba(12,13,14,0.2), 0 0 0 2px #FFF inset;
white-space: nowrap;效果:

前者在最终的渲染图中大小偏大, 因此最终选择第二种方法.
4.域名的购买与备案
备案分为 ICP 备案与公安备案. 当然也可以买在国外服务器用国外的域名服务商, 这样可以逃过备案, 但是不推荐毕竟不是中国特色.
一旦服务器是国内运营商的话, ICP 备案必须经由运营商也就是阿里云(这里的情况)备案. 如果你的域名跟我一样是国外服务商的话(太坑了), 你需要再转到阿里云(万网)上才能具备申请备案资格(卡住你就是这么霸气). 我刚开始 namecheap 上买的域名, 必须等满2个月才能转到万网上, 申请审核又是将近1个月没了, 总共三个月才能用域名访问(期间外网虽然可以域名访问…).
不过如果域名转到阿里云上后申请就变得简单起来, 先提供域名实名认证, 后面在手机 APP 端上传资料按照步骤照做即可(阿里云承诺内部初审一个工作日, 结果不提交工单的话系统催都不理的). 注意审核期间需要关闭网站. 上海这边 ICP 审核还是很快的, 一个工作日就出结果了.
域名换到万网后还需要注意一点的是, namecheap 上很简单地一步设置就可以设置 DNS 解析. 阿里云上稍微有点麻烦, 充了一个不知具体啥功效的 vip(也可以免费 DNS 解析, 不过首年9.9元,我就顺手充了), 在客服的一步步指导下一天多完成了 DNS 解析(因为工单的反馈不是即刻的).
5. 安装 SSL 证书, 使用 https 访问
为什么使用 https 而不是 http 访问, 可以查看此文章. 我也不希望每次浏览器在访问网站时左上角一直显示 “不安全”. 甚至有的浏览器会拒绝访问.
这里以阿里云为前提进行部署. 需要注意的是由于阿里云的很多操作界面一直在变, 此处的参考链接最好直接用搜索引擎查最新的手册或者文章.
平台为 Nginx.
5.1 准备工作
开通默认的 443 https 端口
找到实例的安全组配置界面
快速添加里面有选项 HTTPS(443)
参考链接
SSL 免费证书申请
在阿里云SSL证书页面, 点击 “选购 SSL 证书”, 在打开的页面选择 “DV 单域名证书【免费试用】”如下图:
选择 20 个是免费的, 然后点 “立即购买”, 支付 0 元即可.
域名验证
通过数字证书管理服务控制台
点”创建证书”, 系统会自动从 20 个数量个创建 1 个待申请的证书.
点”证书申请”, 在打开的窗口输入域名,域名验证方式,联系人,所在地和 CSR 生成方式, CSR 选系统生成即可, 其他根据实际情况填写.
域名 DNS 验证是指添加一个 txt 解析记录, 根据 SSL 提示的主机记录, 记录值来填写 DNS 验证, 一般审核很快, 如果没有意外, 3 分钟内即可下发证书.
Hexo 配置文件
_config.yml 文件的下面字段改成 https 开头.
1 | url: https://www.chuxin911.com # 必须以 http:// 或 https:// 开头 |
5.2 Nginx 上部署 SSL 证书
步骤一: 下载证书到本地
登录SSL证书控制台.
在左侧导航栏, 单击SSL 证书.
定位到要下载的证书, 单击操作列的下载.
在证书下载面板, 单击 Nginx 服务器操作列的下载.
该操作会将 Nginx 服务器证书压缩包下载到本地, 并保存在浏览器的默认下载位置.
打开浏览器的默认下载位置, 解压已下载的 Nginx 证书压缩包文件.
解压后将会获得以下文件:
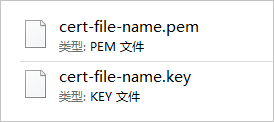
PEM 格式的证书文件.
PEM 格式的证书文件是采用 Base64 编码的文本文件, 可以根据需要将证书文件修改成其他格式. 关于证书格式的更多信息, 请参见主流数字证书都有哪些格式.
KEY 格式的证书私钥文件.
注意 如果您在申请证书时将 CSR 生成方式设置为手动填写, 则下载的证书文件压缩包中不会包含 KEY 文件, 需要手动创建证书私钥文件. 手动创建私钥文件的具体操作, 请参见创建私钥.
步骤二: 在 Nginx 服务器上安装证书
- 把证书传到服务器.
1 | cd /etc/nginx/ #根据自己安装 nginx 的目录以及配置文件目录进行调整. |
scp 上传:
1 | scp *.key *.pem USER@IP:/etc/nginx/cert/ |
- 编辑Nginx配置文件(
nginx.conf), 将下面的片段插到http{}里并修改相应的字段, (如果server配置已存在, 按照以下注释内容修改相应配置即可).
1 | #以下属性中, 以ssl开头的属性表示与证书配置有关. |
- 设置 HTTP 请求自动跳转 HTTPS(可选).
如果希望所有的 HTTP 访问自动跳转到 HTTPS 页面, 则可以在需要跳转的 HTTP 站点下添加以下 rewrite 语句.
注意 以下代码片段需要放置在 nginx.conf 文件中 server {} 代码段后面, 即设置 HTTP 请求自动跳转 HTTPS 后, nginx.conf 文件中会存在两个 server {} 代码段.
1 | server { |
- 重启 Nginx 服务.
校验配置语法是否正确:
1 | nginx -t |
输出为
1 | nginx: the configuration file /etc/nginx/nginx.conf syntax is ok |
表明语法正确.
重启:
1 | nginx -s reload #重新载入配置文件. |
步骤三: 验证是否安装成功
证书安装完成后, 可通过访问证书的绑定域名验证该证书是否安装成功.
1 | https://yourdomain #需要将yourdomain替换成证书绑定的域名. |
如果网页地址栏出现小锁标志, 表示证书已经安装成功.
6. 版本匹配
Ubuntu 从 18.04 升级到 20.04 出现如下问题:
1 | $ hexo |
也许是升级过程中被系统自动删除了, 重新装 nodejs 与 npm, 出错.
1 | $ sudo apt install nodejs |
解决: 删除 /etc/apt/sources.list.d/ 下的 nodesource.list* 再用 apt install .
hexo g 报错:
1 | FATAL { err: |
猜测是版本不匹配导致.
sudo npm i hexo-cli -g 升级hexo-cli, npm update --save 升级 hexo-theme-icarus hexo 等插件. 升级 nodejs 到最新的稳定版报错, 应该是源不可靠, 换成国内源再次尝试.
1 | sudo n stable |
1 | sudo n stable --registry https://registry.npm.taobao.org |
所有涉及到的主要元素都升级到最新的稳定版本后, 终于成功了.
但是令我始料未及的是, icarus 即便是小版本升级也会把某些设置覆盖掉. 例如资源文件夹下的封面图片, latex 数学公式显示等, 又要再重新操作一遍. 幸好我有提前做好备份. 升级一次但愿能维持一段时间吧.
升级一次系统, 一个功能就如此麻烦, 更多未知的功能需要去修复…
附录
参考链接:
https://ji2xpro.github.io/3e3a147e/